The post 8 Tips for Stunning Street Photography Silhouettes appeared first on Digital Photography School. It was authored by Valerie Jardin.
Street photography silhouettes are eye-catching, not to mention beautiful. But beginners often struggle to achieve great results – the kinds of compositions that feature clear main subjects, complementary backgrounds, and gorgeous light.
Here’s the good news:
Creating silhouettes on the street is a lot easier than you think. I’ve been doing it for years, and in this article, I share everything you need to know for amazing results! Specifically, I explain:
The best types of light for great imagesHow to create breathtaking compositions with minimal effortA few quick post-processing tricks to level up your shotsMuch more!Let’s dive right in.
1. Shoot in the right light
For the best silhouettes, you must shoot a dark subject against a well-lit background – which means that the more contrasty the lighting, the better.
You may have heard that great photographers only ever shoot in the morning and the evening (during the golden hours). But when it comes to street photography, nothing could be further from the truth.
Instead, many street photographers love to shoot in the middle of the day, when the sun is high overhead and produces harsh light. The harsh light ensures that certain subjects are powerfully lit, while the high lighting angle creates plenty of interesting shadows (especially in cities with tall buildings).
And shadows are the best friend of the silhouette street photographer.
Why? Because if you can find a bright background, and then – just in front of the background – is a shadow, subjects who walk by will be darkened by the shadow and silhouetted against the bright background.
Of course, you can capture great results when the sun is lower in the sky. An evening sun can produce long shadows (so you can create the same effect discussed above). Plus, if you shoot during the golden hours, you can angle your camera so that your subject is silhouetted against a breathtaking sunset.
If you’re after silhouettes, I’d encourage you to avoid photographing on cloudy days, though. Clouds soften the light and limit contrast. (If you’re dead set on capturing silhouettes, try shooting indoors, where you can use the contrast between your subject and a window to get a beautiful result!)
2. Choose the perfect camera settings
To shoot a street photography silhouette, you must take control of your camera. Silhouettes require radical underexposure, so work in Manual mode (so you can choose your settings independently) or Aperture Priority (so you can underexpose via exposure compensation).
Make sure your flash is turned off, then – if you have the time – take some test shots of your scene. You’ll want to keep adjusting the exposure until your foreground subjects are completely black; add negative exposure compensation or boost the shutter speed.
A timesaving trick here is to point your camera at the bright area behind the subject, lock the exposure settings, recompose, and capture your shot. That way, your camera will expose for the background and render the foreground black. Make sense?
Another option is to set your camera to its spot metering mode, then meter off the brightest area behind the subject.
(If you leave your camera to its own devices, it’ll often try to expose for your subject. The result will include far too much detail in the subject and blow out the highlights in the background.)
Make sure you carefully focus on your silhouetted subject. If you’re struggling to lock onto your subject, you can try switching over to manual focus. To give yourself room for error, narrow the aperture to f/8 or so for a deeper depth of field.
3. Don’t be afraid to blow out the highlights
Some street photography silhouettes rely on highlight detail. Subjects captured against a rising or setting sun, for instance, can feature beautiful background clouds that add plenty of color and atmosphere.
That said…
Sometimes you can let the highlights blow out for a more dramatic effect.
In other words, you can subtly adjust your exposure to create a bright-white background, like this:
To get this effect, you’ll need to make sure your subject is sufficiently shaded and your background is sufficiently bright. You need real contrast. If you’re outdoors, try to find a bright white background and wait for a subject to walk by; if you’re inside, look for larger windows that’ll offer plenty of brightness.
And aim to set your exposure somewhere between the shaded subject and well-lit background. You can expose for the subject but drop the exposure a few stops, or you can expose for the background but raise the exposure a few stops. (If you’re not sure which method you prefer, try both!)
4. Capture the right outline
Great street photos don’t include just any silhouette. Instead, they feature silhouettes that:
Are well-definedHave a recognizable shapeDo not have any additional items (such as signs) protruding from the main outlineWhat’s important here is that the viewer can clearly tell the silhouette is created by a person. Therefore, it’s best to shoot subjects that are facing sideways (so that their nose and chin are visible) or forward (so that you can see their arms, legs, and head), and it’s important to avoid letting the silhouette overlap with other silhouetted objects, such as street scenes or even other people.
For an even more dynamic image, capture subjects in mid-stride or mid-gesture:
To get the best results with moving subjects, you’ll need to be fast. Raise your camera to your eye a few seconds before the subject walks by, then hit the shutter button just as they take a step!
5. Avoid obstructions
The best silhouette street photos contain an unobstructed view of the subject. In other words, the image should have no foreground or background elements that cross the subject, such as posts, signs, other people, or cars.
Why is this important?
Good silhouettes feature clear outlines. But if elements cross your subject, the outline will become confusing, and the viewer will struggle to interpret the shot.
So before you take an image, glance across the entire composition. Ask yourself: Do I see any problematic elements that could muddy up the silhouette? If so, see if you can fix the problem by moving a few feet to the left or the right. You can also try dropping down low – or, if you’re shooting a moving element, you could simply wait until it changes position.
When capturing the image below, I waited until the woman with the suitcase walked between the posts. Then I fired the shutter!
6. Add in a creative effect or two
If you want to take your street photos to the next level, don’t just achieve a solid silhouette outline and call it a day. Instead, strive to incorporate creative effects into your shots!
For instance, by stopping down your lens aperture and positioning the sun along the edge of an object, you can create a beautiful sunburst:
Another option is to shoot with flowers or leaves close to your camera, then use a wide aperture to create a pleasing blur.
I’d also encourage you to change up your angle. By getting down low, you can make your silhouetted subject loom over the viewer – and by getting up high, you can capture wider street scenes that feature all sorts of action.
7. Try a minimalist approach
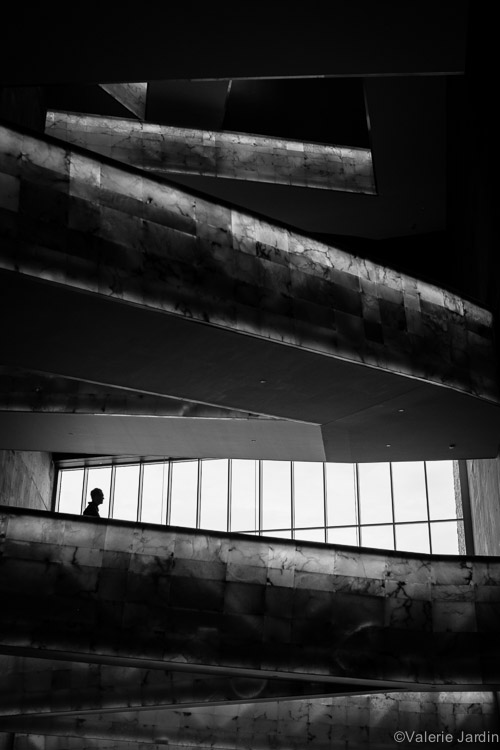
Minimalism refers to a compositional approach that includes plenty of negative space. The subject is often small in the frame, like this:
And because silhouette scenes tend to lack lots of detail and because the main subject is generally so eye-catching, they lend themselves well to a minimalist approach.
The key here is to find a scene that offers plenty of negative space. Look for buildings with bright windows, stretches of ocean with silhouetted passersby, and bridges that you can photograph from below.
Get into position. Make sure to compose so that you include lots of empty space around the subject. Test out a few compositions if you have the time, just so you can get a sense of what works and what doesn’t.
Then, when the right subject walks through the area, take a shot! The small silhouetted person will anchor the composition, and you’ll end up with a beautifully minimalistic street photo.
8. Enhance your silhouette in post-processing
Great street photos start in the field. If you don’t get the camera settings right, the composition right, and the lighting right, then your shots just won’t look good no matter how much time you spend on editing.
However, once you’ve captured a good silhouette in the field, you can certainly enhance it with a bit of post-processing. (And if you work in RAW – which I highly recommend! – then processing is a necessary part of your photography workflow anyway.)
Start by tweaking the exposure and the white balance. Make sure you have the overall look that you’re after, then dive into your heavier editing options. Boosting the contrast is generally a good move. If you find that your subject includes too much detail but you don’t want to tweak the highlights, try dropping the blacks or the shadows; conversely, if you like the look of your subject but you want to brighten the background, try boosting the whites or the highlights.
You might also play with different saturation values. And if you want to create a very unique effect, consider adding some sort of color grade. At the end of the day, this is about personal preference – so you won’t know what works until you try it!
Street photography silhouettes: final words
Now that you’ve finished this article, you’re capable of capturing outstanding street silhouettes.
Just remember the tips I’ve shared, make sure you spend plenty of time out with your camera, and have fun experimenting!
Now over to you:
Which of these tips do you plan to use first? Share your thoughts in the comments below!
Table of contents
Street Photography
The post 8 Tips for Stunning Street Photography Silhouettes appeared first on Digital Photography School. It was authored by Valerie Jardin.